Showing posts with label glitter. Show all posts

Tuesday, December 18, 2012

10 easy gift wrappings for everyone


It's time to say goodbye... to blogspot! But also HELLO to new MARIAJUSTDOIT.COM Check what's goin on there...
BEST,
MARIA!


There is much to do before Christmas. Decorations, special food, presents and of course 
wrappings. It’s not so complicated as You might think. The easiest way is to use paper (waste paper is perfect for eco fans), different types of ribbons, sting, and small Christmas ornaments. 10 simple wrappings are for those who like different styles, colors and lots of fun. So check which one is your favorite and… Just do it!

To make a gift wrapping You need:

- paper

- ribbons
- colourful string: gold, silver, neon
- scissors
- needle
- tape with double side glue 

- paper lace trim napkin

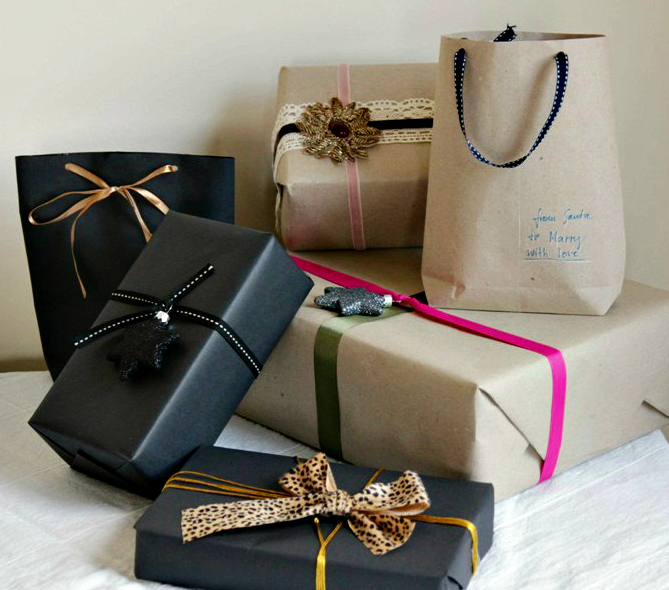
Paper lace trim napkin wrapping

Cut napkin in a half. Tape it and add red ribbon. 

Neon string wrapping

Twine a box 3 times with neon string from top to bottom and from left to right side. Keep space between them. Make a bow. 
Elegant style wrapping

1. Cover a box up with black paper and  make a knot with black-beige ribbon. Add some extra blink blink using Christmas tree decoration.


 2. Twine the box with gold thread and make bow using exotic print ribbon.

Vintage

Cover box up with waste paper. Put lace and two velvet ribbons with extra gold detail on the top.  


Minimalistic

Cross two ribbons and just add glitter detail.


I used Christmas decorations from previous DIY to make 4 more wrappings. Check here.


If You don’t want to spend extra money for a paper bag – just do one by yourself. 
1. Fold both sides of sheet of paper (50cm/35 cm) to meet in the middle.
2. Stick the double side glue tape on the edge of the paper and put both sides together 


 3. Fold the bottom part about 5 cm wide.
4. Open it and crease the flaps inward.

5. Fold both flaps in the middle.
6. Stick the tape across the bottom of the bag.

7. Stick a piece of tape in the place where You gonna make holes. Then punch holes through the top of the bag. Use ribbons to make handles.


Enjoy 
Maria! 

Tuesday, December 11, 2012

Christmas decoration with hint of mint


It's time to say goodbye... to blogspot! But also HELLO to new MARIAJUSTDOIT.COM Check what's goin on there...
BEST,
MARIA!


Have You already thought about Christmas decorations? Well, it’s perfect time to find out what to put on the table and Christmas tree. But what color? I decided to make 3 easy projects with lovely mint shade. It was very popular during the summer and still it is. Paper, felt and some glitter will help to create simple and classic ornaments. Just do it!


To make decorations You need:
- color paper 
- acrylic glue
- pom pom tape 
- color beads or pearls
- color thread 
- ribbons
- color felt 
- needle
- scissors


Pom pom chain


1. String pom pom first and make loop. Then repeat it with bead or pearl.


Stars 


2. Cut 10 cm diameter circle. 
3. On the edges mark points that are half of diameter (5 cm).
4. Connect points.
5. Cut out a star.


6. Fold the nearest points.


7. Fold the arms of the star. You can cover it with glue and sprinkle with glitter.


Paper Christmas ball

8. Cut three circles about 5 cm diameter. I use different blue shades.
9. Put all circles together and fold them in the middle.
10. Sew them on.
11. Make a loop.


Felt tree 


12. Cut two Christmas tree shapes from felt.
13. Sew them on.
14. Stuff with wadding.
15. You can put some extra decorating stitches or colorful button.


 Thaa... daaa...


Oh... and of course glitter button
Use a big button. Cover it up with mixture of glitter and acrylic glue. Sew a bow on. 

 Enjoy 
  Maria!

Tuesday, October 23, 2012

Glamorous jewellery box


It's time to say goodbye... to blogspot! But also HELLO to new MARIAJUSTDOIT.COM Check what's goin on there...
BEST,
MARIA!


   There is always not enough space for Your jewellery! So it means that You need more storage for all kind of rings, bracelets, necklaces and other bling bling things! Well here is solution – glamour jewellery box where You can keep all Your shiny details in one place. Just use wood box, paint and lots of glitter with velvet touch to make practical and stylish accessory. So Just do it!

You gonna need:

-          6 kitchen sponges
-          scissors
-          wooden box ( diameter 18 cm)
-          vinyl glue
-          blue paint (tempera or spray)
-          glitter
-          velvet ribbon (52 cm)
-          needle and thread
-          piece of velvet (27 cm x 37cm)
-          glosy spray finish


Place sponges next to each other.


Copy the shape of the box.


Cut the curves.


Check all the pieces if they match.


Pair and glue sponges. 


Cut a piece of velvet ( 27cm x 37 cm – for box with diameter 18 cm)
We work the size of the inset out by creating the square, whose side equals the diameter of the box. Then add 9 and 19 cm to created sides so that to achieve the rectangle.


Place sponges on a fabric (the fabric should be between them). Pin down spare velvet.


Paint the box twice - outside and inside. Wait until dry. Place sponges with velvet.


Mix glue and glitter into a thick paste. Apply on a lid. 


Cover the entire surface – tab if You need it.


Allow glue to dry (even 24 hours), then spray with glossy spray finish.
Glue velvet ribbon (36 cm) 


Make and attach a bow (need 16 cm)


Thaaaa daaa!


 Enjoy!
Maria!